Features and Operation of the Original K-Mount
- Lenses:
- SMC Pentax i, SMC Pentax-M
- Bodies:
- K-series, all M-series (except the ME F), LX
- Compatibility Issues:
- Bodies in this group are unusable with the FAJ lenses, and lenses in this group are virtually unusable with bodies featuring the “crippled” KAF mount. All other possible combinations produce manual-focus cameras with full-frame and center-weighted metering and capable of M or Av operation.
Overview
In the first half of 1975 Pentax introduced the K2, KX, and KM camera bodies along with three SMC Pentax lenses: 50/1.2, 50/1.4, and 55/1.8. This was a turning point in the company’s history because these new products no longer used the venerable and long-lived M42 threaded mount. Instead, they feature the original K-mount — a bayonet mount that allows faster and more convenient operation and far more precise camera-lens alignment than M42. Furthermore, the K-mount has a larger diameter which allows the design of faster lenses (e.g., 50/1.2, 85/1.4, 135/1.8). The K-mount preserves the M42’s register distance — 45.46 millimeters.
From the very beginning Pentax demonstrated that they are very serious about the new mount — just in 1975 they released three camera bodies, 27 prime lenses, and four zooms. All of these were members of the K series, and while some were based on M42 equipment, many were totally new. In 1976 the K-series equipment fell out of favor, and only one camera body and four lenses were introduced. The reason for this was the introduction of the smaller and lighter M-series bodies and lenses. In 1977 only two K-series zooms lenses were produced, while the M-series equipment picked up speed — a top-of-the-line body and 17 lenses. In general, the M-series equipment is smaller, lighter, and a bit more expensive. The M-series lenses usually achieve a bit lower resolution than their K-series equivalents, but outperform them in overall optical performance.
The original K mount allows the following operating modes:
- Manual (M) — the photographer is fully responsible for achieving proper exposure. He sets the f-stop on the lens and the shutter speed on the body.
- Aperture Priority (Av) — the photographer sets only the f-stop while the body sets a shutter speed that will produce proper exposure. Some camera bodies have exposure compensation dials with which the photographer can control the exposure values relative to the one chosen automatically (18% average grey).
The original K-mount lenses can be separated in three categories:
Mirror Lenses
In the lens tables these lenses are marked with  .
.
These lenses have only one control — the focusing ring. With this ring the photographer selects which image plane will be in focus in the resulting image. Mirror lenses have no diaphragm, so depth of field cannot be affected directly. The amount of light that reaches the film, however, can be controlled — by attaching neutral density filters to the front or rear of the lens.
Manual-Diaphragm Lenses
In the lens tables these lenses are marked with  .
.
In addition to a focusing ring, these lenses also have an aperture ring and a diaphragm. The diaphragm is made up of a number of movable metal blades that form an opening with a variable diameter. The aperture ring controls the positions of the metal blades, and thus the diameter of the diaphragm opening. In turn, this diameter controls the depth of field and the amount of light that reaches the film.
These lenses are known as “manual-diaphragm” because the diaphragm can be controlled only manually, via the aperture ring. Thus, the body is unable to open the lens diaphragm during the composition and exposure-calculation phases. The typical operating procedure with such lenses is as follows:
- Set the lens to its widest aperture. This step is optional but highly recommended. The reason is that as a result of it, the image in the viewfinder becomes as bright as possible and the depth of field (DOF) is reduced to a minimum.
- Compose and focus.
- Set an aperture value that will produce the desired DOF. Since the position of the lens diaphragm corresponds exactly to the selected f-stop, the DOF can be judged directly by looking in the viewfinder.
- Calculate and set the desired shutter speed (or let the camera body do it, if in Av mode).
- Trip the shutter.
The repeated opening and closing of the diaphragm when making multiple photos is inconvenient, tedious, and error-prone. It also leads to accelerated mechanical wear and tear of some internal lens mechanisms.
Automatic-Diaphragm Lenses
These are the “standard” lenses, and unless otherwise specified, it is assumed that every lens uses an automatic diaphragm. Lenses in this category have an additional lever that allows the body to open their diaphragms wider than dictated by the aperture ring. In particular, the body keeps the diaphragm fully open at all times except in the short moment of making a photo. The operating procedure is thus reduced to:
- Compose and focus without worrying about the selected f-stop. Since the body keeps the lens diaphragm fully open, the image in the viewfinder is as bright as possible and the DOF is minimal.
- Choose an aperture value that will produce the desired DOF. To see the actual DOF, press the DOF preview lever on the body. If the body does not have such a lever, examine the DOF scales on the lens. If the lens does not have such a scale, calculate the DOF range or look it up in a table.
- Calculate and set the desired shutter speed (or let the camera body do it, if in Av mode).
- Trip the shutter.
Even though DOF preview requires an extra action, the overall convenience is significantly improved.
Operation
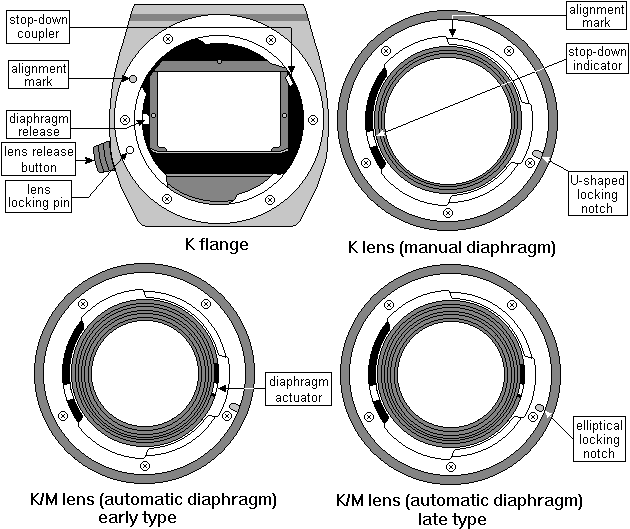
Figure 1. Diagrams of the equipment variations of the original K-mount.
Mounting and Dismounting a Lens
Follow these steps to mount a lens:
- Turn the lens so that its alignment mark roughly matches the position of the body’s alignment mark. Alternatively, if the lighting conditions do not allow the marks to be seen, align the lens “pearl” knob ii with the body’s lens release button.
- Gently insert the lens mount into the body’s mount.
- Turn the lens until a “click” is heard and felt. The lens is now locked into position due to the body’s locking pin protruding into the lens’ locking notch.
Follow these steps to dismount a lens:
- Press the body’s lens release button.
- Turn the lens counter-clockwise as far as it will go.
- Gently separate the lens from the camera body.
Calculating and Setting Exposure
When a body calculates the exposure for a given shot, it takes into account three factors: the film speed, the amount of light that reaches the built-in light meter, and the difference S between the position of the lens diaphragm during metering and during exposure.
The importance of the first two factors is obvious — the more light that passes through the lens and the more sensitive the film is to light, the shorter the exposure time should be. The last fact, however, deserves some explanation. As previously discussed, when a manual-diaphragm lens is used, the diaphragm opening has the same size during the metering and exposure phases. Thus the amount of light reaches the body’s light meter is the same as the amount of light that reaches the film, and no correction is necessary. On the other hand, when an automatic-diaphragm lens is used, the body meters through it wide open while when the exposure is made, the lens is D stops closed down. Thus the exposure time must be increased by D stops. D is controlled by the lens aperture ring, and is communicated to the body via the mechanical coupling between the lens stop-down indicator and the body’s stop-down coupler.
In its resting position, the body’s coupler indicates D = 0. Since this is true of all manual-diaphragm lenses, their stop-down indicators are firmly fixed to the lens mount and do not deflect the body’s coupler regardless of the position of the aperture ring.
On the other hand, the stop-down indicator of an automatic-diaphragm lens is firmly fixed to the lens aperture ring. The construction is such that when a lens is mounted on a camera body and when the lens diaphragm is fully open, the stop-down indicator does not deflect the body’s stop-down coupler. Closing the lens by D stops, however, results in turning the stop-down indicator by D stops and deflecting the body’s stop-down coupler by the same amount. Note that the indicator and coupler operation is based on f-stop differences and not on absolute f-stop values. This means that this procedure produces correct results with all lenses, regardless of their widest aperture.
So how does the lens stop-down indicator manage to deflect the body’s stop-down coupler? Simple — it happens during the twisting motion which is part of the process of mounting a lens on a camera body.
Opening and Closing the Lens Diaphragm
A manual-diaphragm lens has a number of diaphragm blades that are connected to a small harness. The harness forces the blades to move together and by the same amount. The harness is attached to a spring that pulls the blades towards their closed position. The lens aperture ring is also connected to the harness, but it counteracts the spring and limits how much the blades can close down. Turning the aperture ring towards a wider aperture stretches the spring and opens up the diaphragm blades. Turning the aperture in the other direction allows the spring to close the blades, but only as mush as the aperture ring will allow.
Automatic-aperture lenses operate in exactly the same manner, but they feature an additional diaphragm actuator lever. Pushing this lever causes the diaphragm to open up fully; releasing it allows the diaphragm to close to the selected f-stop. When fully pushed, this lever has the same absolute position for all lenses regardless of their widest aperture. Notable is that the displacement of the actuator is proportionate to the diameter of the diaphragm opening (thus the displacement between f/2.8 and f/4 is bigger than the displacement between f/16 and f/22).
The camera body has a corresponding control — the diaphragm release. Most of the time this release stays fixed in the position shown in Figure 1. During step 2 of the lens mounting procedure, this release catches the lens diaphragm actuator. During step 3 it pulls the actuator up, and opens up the lens diaphragm. This causes the lens diaphragm to open up fully. Pressing up the camera’s DOF preview button lowers the diaphragm release, which allows the lens diaphragm to close to the selected f-stop. Releasing the DOF preview button raises the diaphragm release, and causes the lens to open up fully again.
The following actions happen when the camera’s shutter release is pressed:
- The diaphragm release lever drops fully, thus releasing the lens diaphragm actuator.
- The spring that is coupled to the lens diaphragm starts closing the diaphragm blades.
- The blades close to the position corresponding to the selected f-stop.
- The mirror moves up.
- The shutter opens.
- The selected amount of time is allowed to elapse.
- The shutter closes.
- The mirror moves down.
- The diaphragm release is returned to its normal position, thus pushing on the lens diaphragm actuator and opening up the lens diaphragm.
i = Commonly referred to as “K” lenses.
ii = The “pearl” knob is located just in front of the aperture ring, and cannot be seen in the above diagram.